How to Use Font Awesome in Photoshop Designs

The old-fashioned technique to create icons used to be manually cropping images to work as icons.
This was extremely time-consuming. Now Google’s Font Awesome icons solve this issue.
In this tutorial, you will learn how to place a Font Awesome icon in your Photoshop web document by simply typing in the icon’s name.
For the purpose of this tutorial, we will be working with Font Awesome Free. We will be using it with Photoshop CC 2018 installed on Windows 10.
You can apply these instructions as well to a paid version of Google Font Awesome Icons. Both the Free and Paid sets of icons can also be installed on Mac.
Step #1. Download the Font Awesome Free Icons
- Go to Font Awesome website and download the Font Awesome Free.

- Unzip the downloaded file on your hard drive. You should now see two folders:
- fontawesome-free-x.y.z File folder
- fontawesome-free-x.y.z Compressed (zipped) folder

- Go to the fontawesome-free-x.y.z file folder. You will see another fontawesome-free-x.y.z folder. Open it up.
- You will see a few folders and files. Find the use-on-desktop folder:

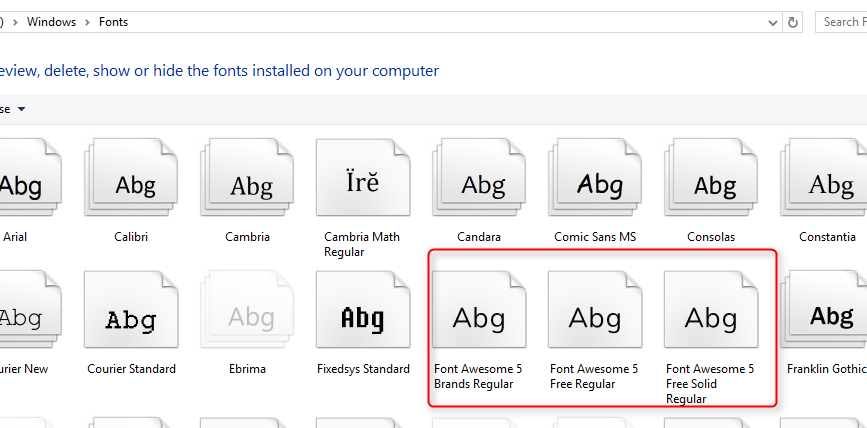
- Click on this folder. You should now see the Font Awesome font files:

- Right-click on any one of the three font types. To learn more how each of them displays icons, please visit the Font Awesome Icons Gallery:
![]()
- You will see the Context Menu popup. Click Install:

- Your font will install nearly instantly. Repeat the steps above to install the rest two font types if you wish.
Well done! You now have the Font Awesome font files installed on your Windows. Let’s just double check to make sure they did get installed on our Windows and are ready under our Photoshop.
- In your Windows, launch the Font Manager. You should see your font(s) happily displayed. I installed all three of them. So, my Font Manager displays all three for me:
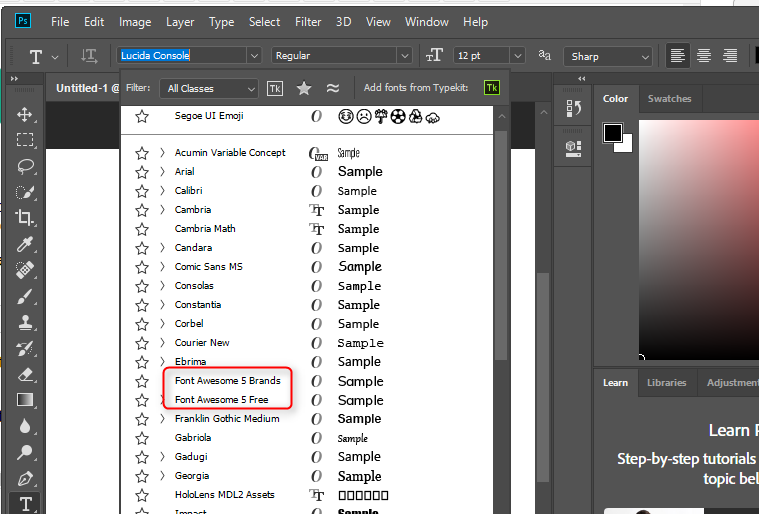
- Launch your Photoshop. Open up the list of fonts available to you. You should now see the Font Awesome fonts listed, with one Font Awesome Free entry for both the Free Regular and the Free Solid Regular font types:
Step #2. Find a Font Awesome Icon Name
The Font Awesome Icons are now ready at your Photoshop as font types. Before you will be able to use an icon in your new or existing Photoshop document you need to find the icon name.
- Go to the “Font Awesome Free’s Cheatsheet“. Select the required font type. For the purpose of this tutorial, I selected the “Solid”.
-
Find the icon name next to the icon you would like to use. For the purpose of this tutorial, I selected to add to my Photoshop image document the “address-card”:
![]()
Excellent! You are now all set to add the selected Google Font Awesome icon to your new or existing Photoshop document.
Step #3. Add the Icon to Your Photoshop Image Document
You are now ready to add the “address-card” icon to your new or existing Photoshop document. In my example, I will be adding it to a new document.
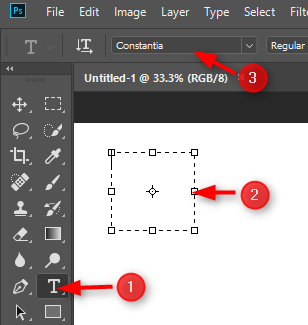
- Launch your Photoshop and create a new document. Click Horizontal Type tool.
- Draw a rectangle.
- Select Font Awesome Free:
- Type address-card inside the rectangle:
![]()
- Once you typed the full icon name, you will see the address-card text replaced by the icon itself:
![]()
There you have it. With your selected Google Font Awesome icon at your disposal, you can now carry on creating the rest of your Photoshop image document as you wish.
Additional Reading
- The Beginners Guide to Font Awesome
- Insert Font Awesome Icons in WordPress Posts and Pages
- Use Font Awesome Icons in WordPress Menu Items
- Add Font Awesome Icons to Your Drupal Menus
- Adding Font Awesome or Bootstrap Icons to Your Joomla Menu
great, works like a charm, ty
Thanks!
I know what you are saying. Ok, you have done or showing great job I am so glad of you. This is one kind of unique post.
Thank you.
Thank You, This is a very helpful stuff. Thanks again.
thx nice tutorial . i just do it in 2 mints to read this :). thxxx alot . 🙂
Perfect Guide..Thank You !!
AWESOME BRO
i cant use font awesomein photoshop
this does not work any more
this doesn’t work in Adobe Muse. Maybe i got something wrong but i get other icons when pasting.
it dosnt work anymore ??
If it doesn’t work, download and install the font again, it may have been updated or changed.
Thanks for the tutorial, but it doesn’t work with Photoshop CC in Windows 10. Apparently, it blocks the font from being listed in the Photoshop font list. Tried restarting Photoshop. Thanks though.
Update: The directions are just a bit out of date it seems for PS/Win10.
How to:
Unpack the zip file
Double click the FontAwesome font(s) you want to install.
Restart Photoshop
Wow its simple but beautiful font. I am going to add this in my Photoshop version.Thank you for the download link as well.
Thanks nice article.its worked really
.
very helpful. . . . .
thanks dear
Thanks for share those awesome technique. I will apply in my infographic design
Great, Perfect Guide..Thank You so much !!
Thanks for the kind words, Satiz! 🙂
wow.. thank you.
thanks for this. works perfectly 🙂
Great tutorial. Thx a lot and have fun !
Very Useful thank u
Thanks for the kind words Kavitha
Daniel
WHERE IS THE LIKE BUTTONNN FOR THE ARTICLE … oh nevermind i found it.
I think [url=http://fontawesome.io/icons/]http://fontawesome.io/icons/[/url] have update their site or something because u cant copy any more.
@shadracknyagwaswajr It works… I used the instructions from this site [url=https://edex.adobe.com/resource/ff62-8cf/]https://edex.adobe.com/reso…[/url] Once you install the font just make sure you copy & paste the icon itself and NOT the unicode (like I did). Hope this helps.
Don’t copy from the /icons page, you need to copy from the /cheatsheet page.
Thank you Conor i figured it after a few hours.
No worries, I figured after 5 months you’d have the answer. Figured I’d pop the answer here for the next guy (or my wife – who also struggled with this) 🙂
For those who cant copy it from the website use this link, this worked for me. Also you can copy and paste it in a text box that already has text and get a box with an X make sure to highlight the text and use the “fontawesome” font
[url=http://fontawesome.io/cheatsheet/]http://fontawesome.io/cheat…[/url]
Thank you!!! 🙂
Thank you – Worked as instructed!
Thanks! Useful!
Thanks for the post.
You are welcome, dwayne!
this does not work any more icons, like ‘search’ for Photoshop.
Make sure you set the font weight to bold, not regular.. you see the text in regular and the icon in bold…
Thank you for this, I was stuck here for about a half hour and was getting frustrated.
This was the piece I was missing… BOLD! Thank you!
I love you! I’ve been pulling my hair out for an hour why some icons would work and some others won’t! And this was the issue. Some icons just don’t work unless you set it to ‘solid’.
Unbelievable that neither the official font awesome website nor any other tutorial mentions this.
Tks for this! 🙂
You are welcome!
Font Awesome was created by Dave Gandy and is now owned by Fonticons, Inc. Font Awesome is not a Google product.
thank you
Hi, absolutely got tons of value from your post. Please i have 2 quick questions.
1. What is the number of plugins every blogger shouldn’t exceed? I currently have about 18 installed, would you consider that number outrageous. Please could you also check out my site and offer me a
2. Your font is really beautiful. would you suggest plugins that would give me beautiful fonts just like yours?
great..thanks!
thank you